How to Calculate Fabric Consumption for Garments: Formulas, Examples & Quick-Reference Guide
What you’ll get from this guide: Two complete methods for calculating fabric consumption — weight-based (for knits) and marker-based (for wovens) — with worked examples for a T-shirt, formal shirt, trouser, and kurti. Plus a wastage allowance guide, a quick-reference consumption chart for 10 common garments, and the most common mistakes that cause factories to over-buy or run short.
Fabric is the biggest cost in any garment. Ask any production manager and they’ll tell you the same thing: 60 to 70 percent of the total manufacturing cost of a garment is fabric. Which means that getting your fabric consumption calculation wrong — even by a small percentage — hits your margin harder than almost any other mistake you can make.
Over-calculate and you’re sitting on expensive leftover stock. Under-calculate and you’re scrambling mid-production, paying premium prices for top-up fabric, or worse, delivering short on an export order and facing penalty clauses.
This guide explains fabric consumption calculation in plain language. We’ll go through both main methods — weight-based for knits, marker-based for wovens — with real numbers you can follow along with. By the end, you’ll be able to calculate consumption for any standard garment without guesswork.
Why Fabric Consumption Matters So Much
Let’s put it in concrete terms. Say you’re manufacturing 5,000 T-shirts and your consumption estimate is off by just 50 grams per piece. That’s 250 kg of extra fabric you’ve either bought unnecessarily or are now short of. At ₹250 per kg for 160 GSM cotton fabric, that’s ₹62,500 — from one small error on one order.
Scale that across a dozen styles and a few hundred orders per year, and you can see how factories that calculate consumption precisely hold a significant cost advantage over those that estimate loosely or rely purely on experience.
“In garment manufacturing, the pattern master calculates consumption. Everyone else just places the order. But when you understand the calculation yourself, you can check the number — and that’s when you find the mistakes.”
Merchandisers and buyers who understand fabric consumption can also negotiate more effectively with suppliers, verify that the FOB price they’ve been quoted makes sense, and catch when someone is padding the consumption figure to protect their own margin.
Fabric makes up 60–70% of garment cost. A small per-piece consumption error multiplies rapidly at production scale.
Two Methods: Weight-Based vs Marker-Based
There are two standard methods for calculating fabric consumption, and the correct one to use depends entirely on the type of fabric and garment you’re working with.
| Method | Use For | Fabric Bought In | Key Input |
|---|---|---|---|
| Weight-Based | Knit garments (T-shirts, polos, hoodies, leggings) | Kilograms (by weight) | GSM, body measurements |
| Marker-Based | Woven garments (formal shirts, trousers, kurtis, jackets) | Metres (by length) | Marker length, garments per marker |
Both methods add a wastage allowance at the end to account for the fabric that doesn’t end up in the finished garment — end bits, selvedge loss, cutting irregularities, and defect zones. We’ll cover wastage in detail after the formulas.
Method 1: Weight-Based Calculation (Knit Garments)
This method is used when fabric is purchased by weight — which is standard for knitted fabrics like jersey, interlock, fleece, and rib used in T-shirts, round-neck tops, sweatshirts, and loungewear.
The logic is straightforward: calculate the area of fabric each garment piece needs, multiply by GSM to get weight, then multiply by quantity.
— Half Chest: half the chest measurement, in cm, with seam allowance added
— Sleeve Length: from shoulder seam to cuff, in cm
— Sleeve Width: at widest point (bicep), in cm
— GSM: fabric weight in grams per square metre
— ÷ 10,000,000: converts cm² × GSM to kilograms
Measurements (with 2 cm seam allowance added to each):
Body length (HPS to hem) = 72 cm | Half chest = 52 cm | Sleeve length = 22 cm | Sleeve width = 20 cm
GSM = 180 | Fabric width (tubular) = 76 cm
Body area = 72 × 52 × 2 = 7,488 cm² Sleeve area = 22 × 20 × 2 = 880 cm² Total area = 7,488 + 880 = 8,368 cm² Weight per garment = 8,368 × 180 ÷ 10,000,000 = 0.151 kg per piece Add 8% wastage: 0.151 × 1.08 = 0.163 kg per piece For 2,000 pcs: 0.163 × 2,000 = 326 kg of fabric required
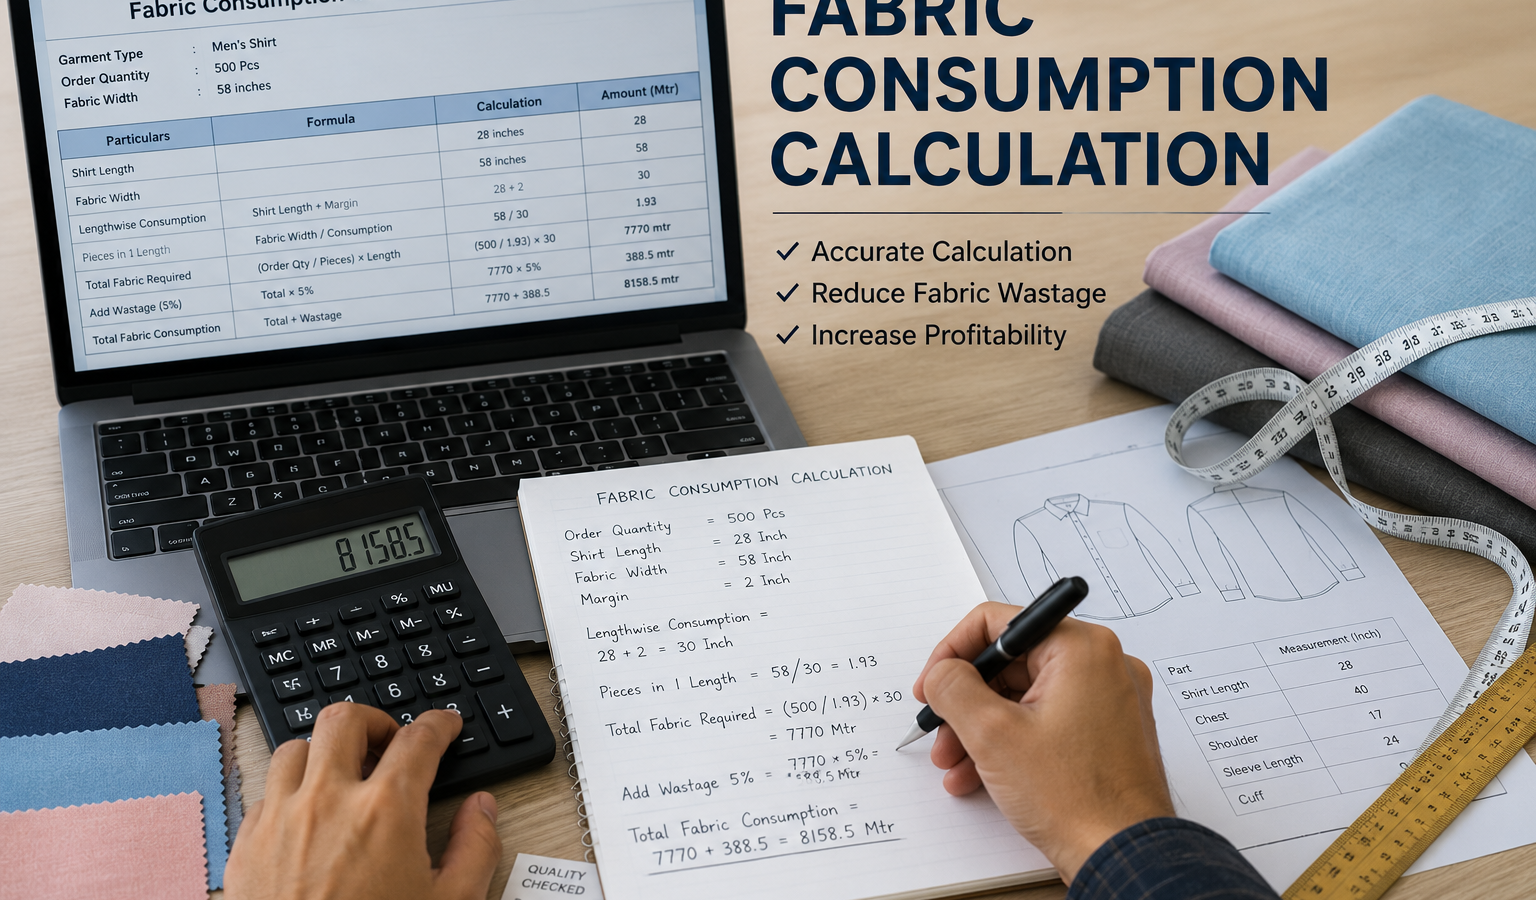
Method 2: Marker-Based Calculation (Woven Garments)
For woven fabrics — the kind used in formal shirts, salwar kameez, kurtis, trousers, denim jeans, and jackets — fabric is bought in metres, not kilograms. The marker-based method is used because woven garments have multiple structured pieces (fronts, backs, sleeves, collars, cuffs, pockets, facings) that need to be laid out efficiently on the fabric width.
A “marker” is the paper or digital template that shows how all the pattern pieces for a batch of garments are arranged on the fabric. The marker length tells you exactly how much fabric length you need to cut that batch. From there, calculating consumption is simple division.
— Garments in Marker: how many garment sets fit in that marker (e.g. 10 shirts in one 8.5m marker)
— Order Quantity: total pieces to produce
— Wastage%: add as a percentage (typically 5–12% depending on garment and fabric type)
Marker length = 9.2 metres | Garments in marker = 12 shirts | Order = 3,000 shirts | Wastage = 8%
Consumption per shirt = 9.2 ÷ 12 = 0.767 metres per shirt Base fabric required = 0.767 × 3,000 = 2,301 metres Add 8% wastage: 2,301 × 1.08 = 2,485 metres total At 50m per roll: 2,485 ÷ 50 = 50 rolls (round up to 50 rolls)
Measurements: Body length = 46 inches | Chest = 40 inches | Sleeve length = 8 inches (short sleeve)
Fabric width = 44 inches | Fabric is a solid-colour viscose challis
Area method (when marker is not available):
Front + Back area = 46 × 22 × 2 = 2,024 sq. in = 1.306 sq. m Sleeve area = 8 × 14 × 2 = 224 sq. in = 0.145 sq. m Total = 1.451 sq. m → Length on 112cm wide fabric = 1.451 ÷ 1.12 = 1.30 m Add 10% wastage = 1.30 × 1.10 = 1.43 m per kurti For 500 kurtis: 1.43 × 500 = 715 metres required
Understanding Wastage Allowance
No matter how efficient your cutting room is, some fabric will never make it into a finished garment. Wastage comes from multiple places simultaneously, and each type needs to be accounted for separately — then combined into a single percentage you add to your base consumption.
The six sources of fabric wastage in production — always add a combined allowance before placing your fabric order.
Wastage allowance by fabric type
| Fabric Type / Pattern | Recommended Wastage Allowance | Why |
|---|---|---|
| Solid colour woven (plain, twill) | 8–10% | Standard end loss + selvedge + marker gaps |
| Solid colour knit (jersey, interlock) | 7–9% | Lower marker loss on tubular, but shrinkage higher |
| Yarn-dyed stripe (easy repeat) | 10–12% | Stripe matching adds wastage at seams |
| Check fabric (small check) | 12–15% | Both warp and weft must align across seams |
| Large print / placement print | 15–20% | Pattern repeat must be centred per garment piece |
| Embroidered fabric | 12–18% | Cannot cut through embroidery motifs |
| Bias-cut garments | 20–30% | Diagonal cutting wastes significant fabric area |
Quick-Reference: Fabric Consumption for Common Garments
These are indicative consumption figures for standard sizes (typically M/L). Actual consumption will vary based on measurements, fabric width, design details, and wastage. Use these as a starting estimate, then refine with a proper marker or area calculation.
Indicative fabric consumption for 10 common garments at M/L size with standard wastage included. Always verify with an actual marker or area calculation for bulk production.
Step-by-Step: How to Calculate Fabric Consumption Without a CAD System
Most large factories use CAD (Computer-Aided Design) software to generate markers and get precise consumption. But pattern masters, tailors, and smaller manufacturers often need to calculate manually. Here’s the step-by-step method for woven garments using manual patterns:
Step 1 List all garment components. For a full-sleeve formal shirt: front body ×2, back body ×1, sleeve ×2, collar ×1, collar band ×1, cuff ×2, front placket ×1, chest pocket ×1. Don’t miss any piece, including small ones.
Step 2 Measure each component at its longest length and widest width. Use the finished measurement plus seam allowance (typically 1.5–2 cm per seam). This gives you the cutting boundary — the actual rectangle of fabric needed for each piece.
Step 3 Calculate the area of each component (length × width in cm²). For curved or irregular pieces like armholes or collar shapes, use the rectangular boundary — this builds in a small automatic wastage for the curve.
Step 4 Total all component areas in square centimetres. Convert to square metres (divide by 10,000).
Step 5 Divide by usable fabric width in metres to get the fabric length required per garment. Usable width = total fabric width minus 2×selvedge (typically 2–3 cm per side).
Step 6 Add your wastage allowance — 8–10% for solid fabric, more for checks or prints — by multiplying by (1 + wastage fraction).
Step 7 Multiply by order quantity for total fabric required. Round up to the nearest roll quantity (50 m or 100 m per roll is common).
Factors That Change Consumption — What to Watch
Once you’ve done the base calculation, several real-world factors can push your actual consumption above or below the estimate. Understanding them helps you decide how much safety margin to build in:
Size ratio in the order. An order with many XL and XXL garments consumes significantly more fabric than one with mostly S and M. When orders cover multiple sizes, calculate consumption for each size separately, then take the weighted average based on the size ratio. Don’t use the medium-size consumption for an order that’s 40% XL.
Fabric width variation between rolls. Fabric width is not always perfectly consistent across rolls in a batch. A roll declared as 58 inches might measure 56.5 inches in the middle. If your consumption calculation assumed 58 inches usable, you may end up short. Take width readings from multiple points on sample rolls before committing to a quantity.
Shrinkage of the fabric. If you’re cutting before the fabric is washed and the finished garment will be washed, you need to account for shrinkage. A fabric with 4% warp shrinkage effectively needs 4% more fabric length to produce the same finished length. Test shrinkage on samples before committing to bulk consumption figures.
Number of layers (spread count). When spreading fabric for cutting, more layers generally reduces end-bit wastage as a percentage. A low-volume run of 200 pieces will have higher effective wastage than a run of 2,000 pieces on the same fabric — the end bits are the same length regardless of how many layers you spread.
Frequently Asked Questions
- What is fabric consumption in garment manufacturing?
- Fabric consumption is the total amount of fabric needed to produce one garment — including both the fabric that ends up in the finished piece and the fabric lost to cutting wastage, selvedge, end bits, and shrinkage. It’s expressed either in kilograms (for knit fabric) or metres (for woven fabric).
- How do I calculate fabric consumption for a T-shirt?
- Use the weight-based method for knit fabrics. Measure the body length, half chest, sleeve length, and sleeve width (with seam allowances). Calculate the area of front+back (body length × half chest × 2) and sleeves (sleeve length × sleeve width × 2). Multiply the total area in cm² by GSM and divide by 10,000,000 to get kilograms per garment. Then add 8–10% wastage.
- How much fabric is needed for one kurti?
- A straight kurti typically needs 2.0–2.3 metres of 44-inch fabric for an M/L size. An Anarkali or heavily flared style can need 3.0–3.5 metres. These are estimates — actual consumption depends on design details, size, and fabric width. Always do a proper calculation before placing a large order.
- What is a good wastage allowance percentage for fabric?
- For solid-colour woven fabric, 8–10% is the standard allowance. Knit fabric is typically 7–9%. Checked or striped fabric needs 12–15% due to pattern matching. Large print repeats can require 15–20% extra. Bias-cut garments have the highest wastage at 20–30%.
- What is the difference between weight-based and marker-based fabric consumption?
- Weight-based calculation is used for knit garments where fabric is purchased in kilograms — you calculate the area of garment pieces and convert using GSM. Marker-based calculation is for woven garments where fabric is bought in metres — you divide the marker layout length by the number of garments in the marker to find metres per piece.
- How does fabric width affect consumption calculation?
- Fabric width directly determines how many garment pieces can fit across the fabric in one cutting lay. Narrower fabric means fewer pieces per row, which either increases the marker length needed or forces you to cut in more rows. Always use the usable net width (full width minus selvedge) in your calculation, not the nominal roll width.
- Can I calculate fabric consumption without a CAD system?
- Yes. You can calculate manually by measuring the rectangular boundary of each garment component, calculating area (length × width), summing all areas, dividing by usable fabric width, and adding wastage allowance. It’s slightly less precise than CAD marker efficiency optimisation, but accurate enough for planning and quoting if done carefully.
Final Thoughts
Fabric consumption calculation is not glamorous work, but it is foundational. Every good garment costing sheet starts here. Every negotiation with a fabric supplier is stronger when you know what your actual consumption figure is. And every production manager who discovers a consumption error after cutting has begun will tell you the same thing: they wish they had checked the number properly at the start.
The formulas are not complicated. A bit of measurement discipline, the right wastage percentage for your fabric type, and the habit of double-checking your width assumption — that’s really all it takes to get this right consistently.
If you want to verify your fabric calculations quickly for an order, try the Fabric Cost Calculator on this site — it handles both weight and length calculations with fabric price built in, so you can go from consumption figure straight to fabric cost in one step.
Leave a Reply