Textile Quality Control: The Complete Fabric Inspection Checklist Every Manufacturer Needs
Quick Summary: This guide gives you a practical, step-by-step quality control checklist for textile and fabric inspection — covering GSM tolerance, weave structure, colour fastness, tensile strength, shrinkage, and the standard 4-Point defect grading system. Use it before dispatch, during production, or at goods-in receiving.
Quality failures in textiles are expensive. A 2-metre defect discovered mid-production line costs you thread and time. The same defect spotted at a buyer’s warehouse in Europe costs you the entire shipment, your reputation, and sometimes the account.
I’ve spent years working with weaving mills, garment exporters, and fabric traders across Gujarat, Surat, and Tiruppur. One thing separates the buyers who keep coming back from the ones who ghost you after the first order: consistent quality documentation. Not just “we checked it” — but a structured checklist that leaves nothing to memory or mood.
This post lays out exactly what that checklist looks like, in plain language, without the textbook jargon. Whether you’re a QC manager at a mill, a sourcing executive checking incoming fabric rolls, or a small exporter preparing for your first compliance audit, this guide is for you.
Why Textile Quality Control Cannot Be Informal
Textile quality issues rarely come from one bad decision. They stack up. A GSM that’s 8% below spec. A weave that looks fine in the warehouse but pills after three washes. A dye lot that shifted between the header and the middle of the roll.
When any of these happen and you don’t have documentation, two bad things follow. First, you can’t trace where in the process the problem started. Second, you have no data to show the buyer that the problem was isolated — not systemic.
“Good fabric doesn’t just feel right. It tests right, measures right, and documents right.”
Buyers sourcing for EU or US markets are also increasingly asking for inspection certificates. OEKO-TEX, GOTS, and even large fast-fashion buyers are making pre-shipment inspection reports mandatory. Having a standard internal checklist means you’re halfway to being audit-ready at any time.
The 7 Stages of Fabric Quality Inspection
Before we get into the checklist line by line, it helps to understand the full flow of where and when QC checks happen in a standard textile operation:
| Stage | Point of Inspection | Who Does It |
|---|---|---|
| 1. Raw Material Receiving | Yarn, fibre, chemicals | Stores / QC team |
| 2. Pre-production | Loom setup, yarn count verification | Production supervisor |
| 3. In-process (Grey fabric) | Weave structure, density, width | Floor QC |
| 4. Post-weaving (Greige) | GSM, tensile strength, shrinkage | QC lab |
| 5. Dyeing & Finishing | Colour fastness, shade variation | Dyehouse QC |
| 6. Final Inspection | Full roll-by-roll check, defect grading | QC manager + buyer rep |
| 7. Pre-shipment | Packing, labelling, quantity | Merchandiser / QC |
Most manufacturers only do stage 6 seriously. Mills that do all seven consistently have far lower rejection rates and end up spending less time on rework overall.
The Complete Textile Quality Control Checklist
Section 1: Physical & Structural Parameters
These are the measurable, lab-testable parameters. They should be verified at stage 4 (post-weaving) and again at stage 6 (final inspection).
- GSM (Grams per Square Metre): Weigh a 10cm × 10cm sample using a GSM cutter and precision balance. Repeat 5 times across the roll width and average. Acceptable tolerance is typically ±5% from spec.
- Fabric Width: Measure finished width selvedge-to-selvedge at three points — start, middle, and end of the roll. Variation greater than ±1 cm across a roll is generally flagged.
- Thread Count / Ends & Picks per inch: Use a pick glass or thread count magnifier. Verify EPI (ends per inch) and PPI (picks per inch) against the buyer’s specification card.
- Weave Structure Verification: Check that the weave pattern (plain, twill, satin, etc.) matches the approved sample. Even one incorrect interlacing repeat shows up under magnification.
- Yarn Count: Take yarn samples from both warp and weft. Test count using the wrapping reel and balance. Cross-check against the order specification.
- Fabric Thickness: Use a fabric thickness gauge at five points. Relevant mainly for technical textiles, nonwovens, and denim where hand feel is critical.
Section 2: Colour & Dyeing Quality
Colour issues are the most common cause of buyer rejections in dyed or printed fabric. These tests must be done after the finishing process is complete.
- Shade Matching (Visual + Spectrophotometer): Compare finished fabric to the approved shade card under D65 and TL84 light sources. Colour difference (ΔE value) should ideally be below 1.0 and must not exceed 1.5 for most buyers.
- Colour Fastness to Washing (ISO 105-C06): Test minimum Grade 4 for colour change and Grade 3-4 for staining on adjacent fabrics for export markets.
- Colour Fastness to Rubbing (ISO 105-X12): Dry rubbing should achieve Grade 4+. Wet rubbing Grade 3 minimum for most apparel applications.
- Colour Fastness to Light (ISO 105-B02): Minimum Grade 4 for outdoor or fashion fabrics. Check this especially for bright or sensitive colours like turquoise, fuchsia, and yellow.
- Dye Lot Consistency: Compare the header metre, middle metre, and tail metre of each roll under the same light source. Roll-to-roll shade variation within a batch should be Grade 4 or above.
- Metamerism Check: View the fabric under at least two different light sources (daylight and fluorescent). If the shade changes significantly between sources, this must be flagged to the buyer before approval.
Section 3: Mechanical & Performance Tests
These tests simulate what the fabric will go through during garment construction and actual use. Skipping them is the most common reason for post-sale complaints.
- Tensile Strength (ASTM D5035 / ISO 13934-1): Tests the force required to break a fabric strip. Minimum values depend on end use — typically 300N+ for workwear, 150N+ for fashion fabric.
- Tear Strength (ISO 13937): Particularly important for woven fabrics used in bags, protective wear, or upholstery. Low tear strength indicates weak yarn or incorrect weave.
- Pilling Resistance (ISO 12945-2): Run the Martindale or Tumble Pilling test. Grade 3-4 is acceptable for most apparel. Grade below 3 will result in returns from markets like Germany and Scandinavia.
- Shrinkage after Washing (ISO 6330): Test warp and weft shrinkage separately after one standard wash cycle. Mark fabric with a template before washing. Shrinkage beyond ±3% for most woven fabrics is a problem unless pre-shrunk finishing is applied.
- Bursting Strength (ISO 13938-1): Required for knits, nonwovens, and stretch fabrics where tensile testing doesn’t apply well.
- Seam Slippage (ISO 13936-1): Relevant for loosely woven fabrics. Tests how much the yarns at a seam line move under load — critical for trouser seams and jacket shoulders.
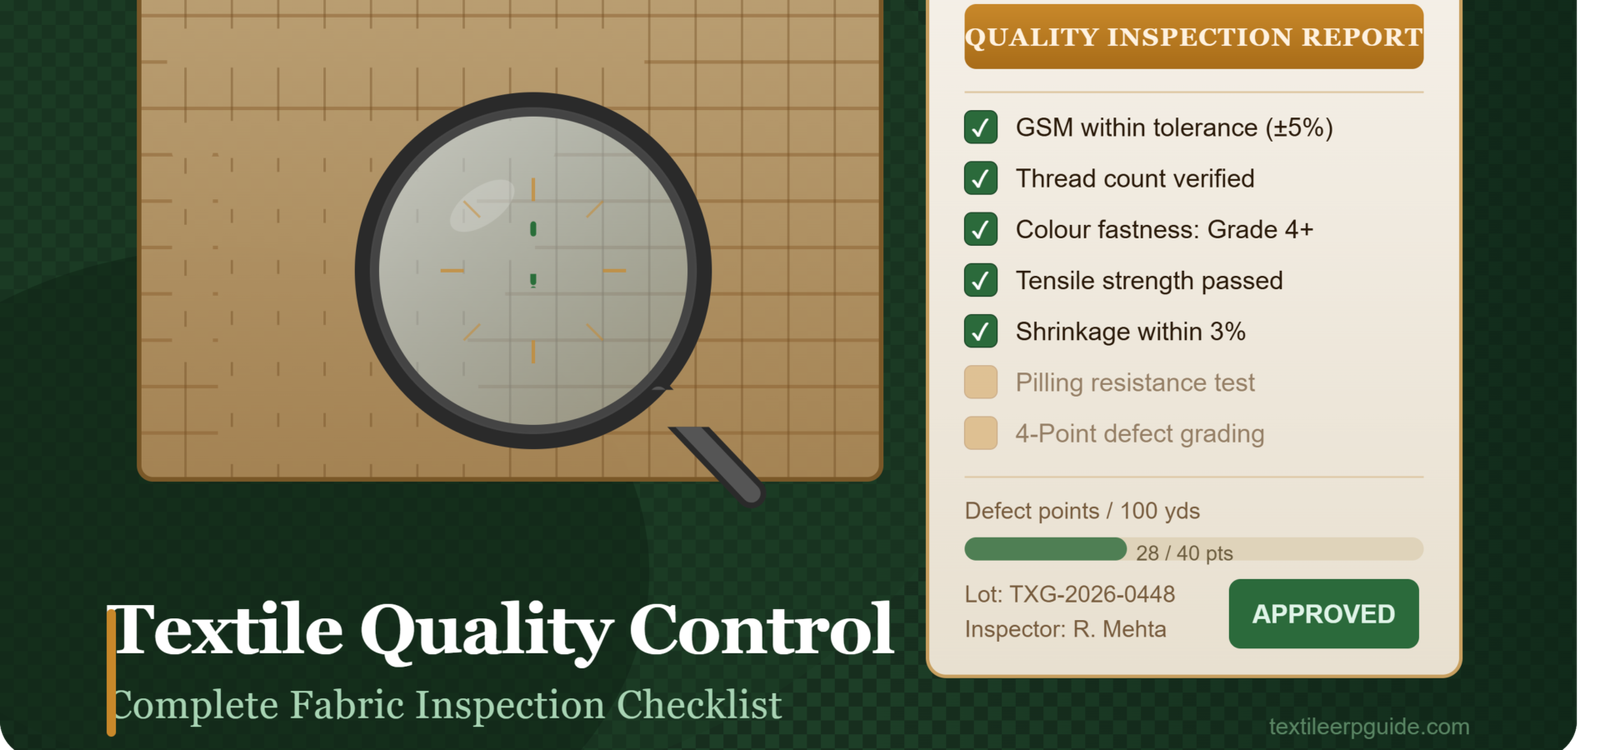
Section 4: Visual Defect Inspection (4-Point System)
The 4-Point grading system is the international standard for visual inspection of woven and knitted fabrics. It scores defects by size and assigns points — a roll is accepted or rejected based on points per 100 linear yards.
| Defect Size | Points Assigned |
|---|---|
| Up to 3 inches (7.5 cm) | 1 point |
| 3 to 6 inches (7.5 – 15 cm) | 2 points |
| 6 to 9 inches (15 – 23 cm) | 3 points |
| Over 9 inches (23 cm+) | 4 points |
| Hole or open warp | 4 points (automatic) |
Acceptable Quality Level (AQL): Most buyers accept up to 40 points per 100 linear yards. Premium or luxury fabric buyers often specify 28 points or lower. Some fast-fashion brands accept up to 60 points for basic commodity fabric.
- Weaving defects: Check for broken ends, missing picks, floats, reed marks, loom stop marks, and tight ends.
- Dyeing defects: Look for patchy dyeing, creasing marks during processing, uneven selvedge dye penetration, and pin marks from stenter frames.
- Finishing defects: Identify cockled selvedges, bowing or skewing (especially in checks and stripes), uneven calendering, and improper tensioning.
- Contamination: Check for oil stains, rust marks from machinery, fly or foreign fibre contamination, and size marks left from sizing paste.
Section 5: Dimensional & Roll Packing Checks
- Roll length verification: Measure each roll length using the inspection machine counter. Cross-check against the roll tag. Tolerance of ±1% per roll is standard.
- Roll weight: Weigh each roll and match against the declared metre-weight. Inconsistencies here usually signal incorrect GSM or inaccurate length measurement.
- Bow and skew in woven fabric: A bow (curved weft) or skew (angled weft) greater than 3% will cause garment panels to twist after washing. Mark and return any roll exceeding this.
- Selvedge quality: Both selvedges should be straight, consistent in width, and free from cuts or unravelling. Exporters often trim selvedges — check that this hasn’t removed usable fabric width.
- Core and packaging: Check that rolls are on correct-diameter cardboard cores, wrapped adequately with polyethylene, and labelled with: article number, lot number, colour, width, and length.
Quick Reference: Common Textile Defects and What Causes Them
| Defect | Likely Cause | Stage to Catch It |
|---|---|---|
| Broken end | Weak warp yarn or poor sizing | In-process (weaving) |
| Reed mark | Bent or damaged reed dent | Greige inspection |
| Pilling | Short fibres in yarn, loose twist | Lab test (post-finishing) |
| Shade bar | Weft yarn lot change, loom stop | Final visual inspection |
| Skewing | Incorrect tension on stenter | Final / dimensional check |
| Cockled selvedge | Excess tension on selvedge ends | Visual inspection |
| Shrinkage excess | No pre-shrink treatment, residual stress | Lab test (wash test) |
| Colour bleeding | Poor dye fixation | Fastness test |
How to Build a QC System That Actually Gets Used
A checklist sitting in a folder helps no one. Here’s how to make sure your quality control process runs consistently, not just when a buyer is visiting:
1. Assign ownership, not just responsibility. Every stage of inspection should have one named person who signs off. “The QC team checked it” is not ownership. “Mahesh Kumar, shift QC, approved roll 47 at 14:30” is ownership.
2. Keep records in a format you can actually search. A basic spreadsheet with roll number, defect points, test results, and date of inspection is far more useful than a pile of paper forms. When a buyer raises a complaint six weeks after shipment, you need to find that record in under two minutes.
3. Do internal calibration checks monthly. If you have multiple QC inspectors, test them on the same roll independently once a month. If their defect point scores differ by more than 20%, you have a training gap.
4. Separate the person doing QC from the person under pressure to ship. This is a structural problem in most small mills. The floor supervisor who is behind on delivery cannot be the one signing off on quality. These must be different people with different reporting lines.
5. Track your rejection rate by defect type. If 60% of your rejections are for shade variation and only 10% are for weave defects, that tells you exactly where to invest in process improvement. Without the data, you’re guessing.
A Note on Third-Party Inspection
For export orders above a certain value — most experienced exporters put this at around $15,000 USD — it is worth arranging a third-party pre-shipment inspection through agencies like SGS, Bureau Veritas, or Intertek. These agencies work to internationally accepted sampling plans (typically AQL 2.5 for critical defects and 4.0 for major defects) and issue a report that provides buyer confidence independent of your own documentation.
Third-party inspection is not a substitute for your internal QC process. It is a final check on your final check. Mills that do thorough internal inspection consistently pass third-party audits. Mills that rely on third-party inspection to catch what they missed internally consistently find the timing and cost painful.
Frequently Asked Questions
- What is the 4-Point system in textile inspection?
- The 4-Point system is a standard method of scoring visual fabric defects by their length. Each defect gets between 1 and 4 points depending on size, and the total points are calculated per 100 linear yards of fabric. Rolls scoring under 40 points per 100 yards are generally accepted.
- What is acceptable GSM tolerance in fabric?
- Most buyers and manufacturers accept ±5% variation from the specified GSM. Some technical or workwear fabrics have tighter tolerances of ±3%. Always confirm the tolerance in writing before production starts.
- How many rolls should be inspected in a batch?
- The standard approach uses a statistical sampling table. For most commercial shipments, inspecting 10–15% of the total rolls is considered sufficient. However, for new suppliers, first orders, or buyers with strict QC requirements, 100% inspection is advisable.
- What causes shrinkage in woven fabric?
- Shrinkage in woven fabrics is primarily caused by residual stress from weaving and finishing tension, fibre swelling when wet, and relaxation of yarns during washing. Pre-shrunk finishing (sanforizing for cotton, heat-setting for synthetic blends) significantly reduces shrinkage.
- What is colour fastness to rubbing and why does it matter?
- Colour fastness to rubbing tests how much dye transfers from a fabric when rubbed. Dry rubbing simulates normal wear; wet rubbing simulates wearing the fabric while wet or sweating. Poor wet rub fastness is a common cause of buyer complaints in denim, reactive-dyed cotton, and dark-coloured synthetics.
Final Thoughts
Quality control in textiles is not glamorous. It doesn’t show up on your website banner. Buyers don’t send thank-you notes when a shipment passes inspection without issues. But after fifteen years of watching mills grow and watching others quietly lose accounts, I can tell you with certainty: the businesses that survive the consolidation happening in India’s textile industry right now are the ones with documentation, systems, and a genuine culture of checking their own work.
Start with this checklist. Adapt it to your specific product. Train your team on it. And then — most importantly — actually use it, every single time.
If you found this useful, bookmark the Textile Calculator Suite on this site — tools like the GSM Calculator and Fabric Cost Calculator work alongside your QC process to keep your production numbers accurate from roll to order.
Leave a Reply